Combating Achilles Tears In Gymnastics (Pt II): Pre-Hab Techniques and How To Help Possibly Reduce Injury

Last week in Part I of this post I outlined my thoughts on what some contributing factors may be to a gymnast suffering an Achilles tear. I talked about some of the aspects related to the forces of gymnastics, biomechanical problems a gymnast may have like missing mobility, jumping and landing techniques, and factors related to the sport of gymnastics itself. I wanted to follow up this post with this weeks article offering some ways that I think people can benefit from using to be pro-active about it, especially as competition season starts to ramp up. The first step in preventing an injury like an Achilles tear is to get educated about the pieces of the puzzle involved. Then with this information, coaches and gymnasts can understand the reasoning behind why they should use pre-hab techniques directly during their training.
Keep in mind, I wrote an entire free e-book on injuries in gymnastics that you can find here
The Gymnastics Medical Injuries Guide
- Understand the most common injuries in male and female gymnastics, why they occur, and how to prevent them
- Read about the most current science on injuries and rehabilitation in gymnastics
- Get tips on the latest injury risk reduction and rehabilitation practices
We take our privacy seriously and will never share your information. Click here to read our full privacy policy.

Take off – Note Achilles loading into forceful dorsiflexion/ “toes up”

Landing of skill – note asymmetrical loading and foot position
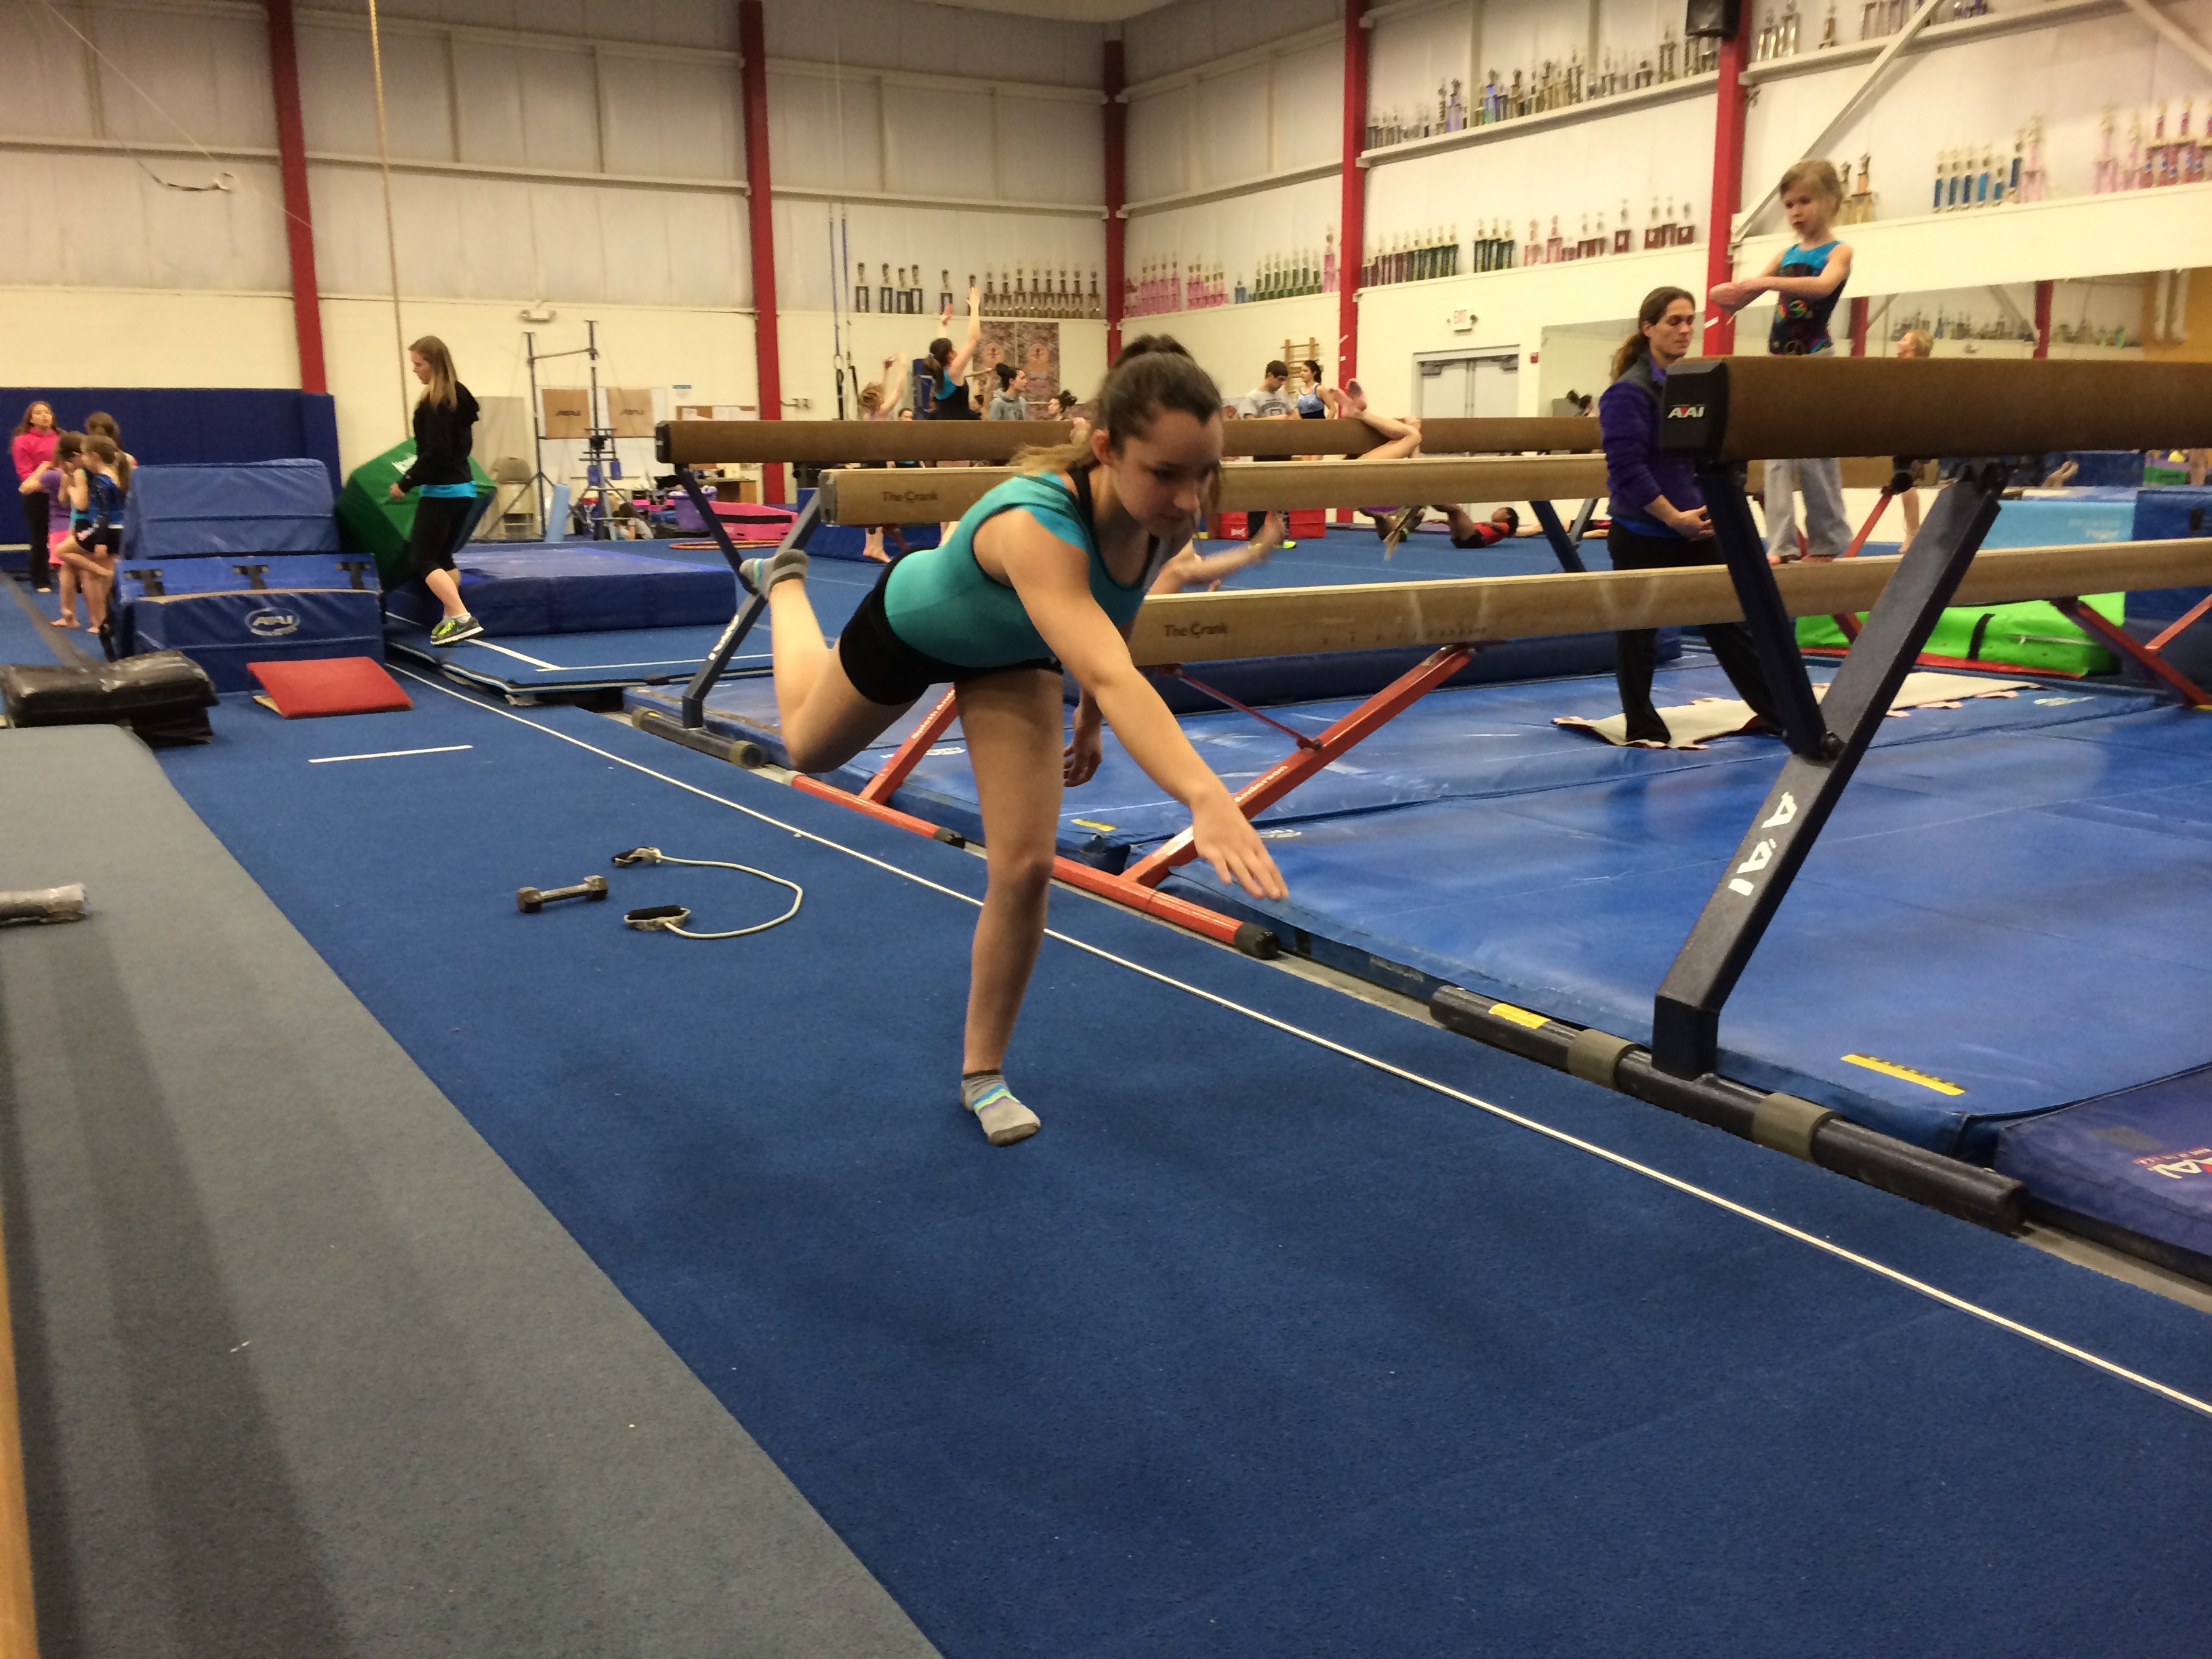
As you can see in this picture above of one of the girls doing a double full, when looked at in slow motion some of the floor take off/landings can be pretty demanding on the lower leg and Achilles. Obviously this is not an ideal landing and may have been just one off pass, but I bet coaches and gymnasts would be amazed to see some of the still frames of take offs and landings from both men’s and women’s events. In the first picture take a look at the forceful dorsiflexion/”toes up” and pronated/flat foot position. In the second look at the asymmetrical load on the right foot more as she lands slightly off, look at the impact forces in the foot flat position. I talked about some of these problems last week, but from a coach’ss, gymnast’s, and physical therapist’s perspective it can be a little concerning.
Gymnastics is a very intense whole body sport that puts a high demand on the gymnast’s body, especially the spine and lower body. Even when an athlete does not have pain or an injury, gymnastics training creates common problem area’s that should be addressed proactively on a maintenance basis. I personally feel that daily integration of pre-hab into training is an essential part of training in order to make sure that gymnasts stay healthy, perform at their best, and have a lengthy career. Ankle and Achilles injuries are one of the most highly occurring problems in gymnastics, which is why I think this type of preventative work is so crucial. When discussing and using any of the information, it has to be done on a regular basis during practice to help make a difference. Building off of last weeks post and taking pictures from above as a good thinking point, I wanted to offer some of the pre-hab techniques that I have built into our gymnastics training to help push off some of the injuries in gymnastics related to the Achilles and heel.
1) Be Smart About Training, and Know Signs of Injury Starting
By far the biggest preventative method coaches and gymnasts can use is to remember that there are many times during gymnastics where it may be more beneficial to train smarter, not always harder. Being a coach, I understand that there are certain times like in pre-season that practice volume goes up for the competitive season approaching. However coaches, gymnasts, and other members of the sport need to be conscious about always putting training into 5th gear and not allowing time for rest and recovery. Last week I listened to a podcast interview with Chris Johnson (PT speciazliing in running and tri-athalons) talking about running injuries. He brought up the point that 90% of runners train at 90% intensity 90% of the time, which is a large reason why 90% of them get some kind of an injury. I think his comment has huge carry over to gymnastics, and is something that plays a huge role in overuse injuries that can lead to bigger problems like in the Achilles. Although the sport creates an environment for pushing yourself and the constant chase of perfection, training at 90% intensity 90% of the time may not be the best path to getting there.
Due to the high forces gymnastics creates and many younger gymnasts not having the muscular development to handle these forces, coaches and gymnasts have to be aware of the volume of gymnastics training. Older athlete’s through high school and college also need to be aware of the amount of impact training they take on, as they have been in the sport longer and have most likely put their Ankles/Achilles through quite a beating. Like I said last week, just because there isn’t pain doesn’t mean their isn’t a problem. Hundreds of impacts between all the events per practice can really take a toll on the Achilles and lower body joints. Making sure the number of impact repetitions is controlled for, emphasizing proper technique, utilizing pre-hab in training, making sure gymnasts are prepared for the skills they are doing, and making sure matting/equipment is maintained are some areas that can be thought about to help avoid Achilles injuries.
There are many other aspects to gymnastics that can be practiced like recovery work, mobility work, coordination and control drills, and pre-hab that are just as important. Many coaches think this type of work is counter productive, but it’s not the case. Any athlete that is pushing through constant injury or pain is not performing at their best, and is also further contributing to the problem. Giving these ideas more attention and building it into training programs is crucial to help possibly prevent both overuse and traumatic issues for the Achilles.

Along with this, recognizing and understanding the start of an Achilles problem is another huge component to making sure an injury doesn’t progress to the point of a tear. First by using some of the education from last week’s post and also other great resources available, coaches and gymnasts can hopefully start to detect what gymnasts may be at the most risk. Gymnasts with flat feet, tight calves, tight quads/hip flexors, poor core control, an acquired an increased lower back arch, bad landing mechanics, train at high intensity, and who may be underdeveloped in their strength should be pro-actively using pre-hab techniques. If any gymnast starts to complain of “nagging” Achilles or heel pain, or is hobbling away from landings or tumbling passes with ankle pain this should be a major red alert. This is the sign that the way they are moving is causing the Achilles to be repetitively damaged and pushing through this just to be tough is both dangerous and not smart training.

These gymnasts should look to refrain from heavy impact landings, work on fixing problems they may have through pre-hab techniques in place of these types of activities, and focus on alleviation/recovery of their pain. If coaches have their gymnasts rest but never fix the underlying biomechanical problems that cause their Achilles pain, it will surely come back as soon as the gymnast starts training again. This is why I think it is so important to investigate the underlying issues that can contribute to Achilles problems, and use pre-hab techniques to address it before it’s a more serious issue. Dr. Josh Eldridge has some great resources through Gymnast Care for at home protocols that can be used as well to help address these problems. This is the best way to make sure repetitive damage is being put on the Achilles, the heel growth plate is not being damaged (Sever’s Disease), or worse a gymnast is not being set up for one shallow back hand spring or landing to rupture their Achilles down the road.
2) Working on the Soft Tissue of the Calf Muscles, and Ankle Joint
After smart training programs and a safe environment are in mind, I personally feel the next most important pre-hab tool gymnasts and coaches can use is work on the soft tissue/ joint mobility for the ankle and calf muscles. Proper mobility of the calf muscles and ankle joint is very important to reduce the stress on the Achilles during impact landings, but it is also critical to allowing proper jumping and landing mechanics. If the calf muscles are very tight, it will limit the amount of depth a gymnast can do during a squat almost always resulting in problems up the leg/trunk chain. We want the calves and ankles to be loose so they are not being forced into a range of motion during tumbling/landings that they do not have comfortably. We also want to promote good landing mechanics as much as possible which I will talk about below. Unfortunately over the years I have seen way to many gymnasts come in every day for a warm up, do a couple calf rolls or toe bounces quickly for their calves, then move right into their splits, bridges, and other areas of gymnastics flexibility.

Calf Muscle Anatomy – http://www.keyaspectscoaching.com/wp-content/uploads/2011/03/calf-muscle-stretches-to-improve-snowboarding.jpg
The first easiest way is to use a dense foam roller or PVC pipe wrapped in tape (a bit less forgiving) to roll out some of the tightness in the calf. The gymnast will put the back of their legs below the knee up on the roller, cross one foot over the other, then use their hands to push their body weight up and down along the calf muscles. The gymnast can also turn the toes in and out to get the different sides of the calf muscles. This primarily gets the calf muscles closest to the surface of the skin, the gastrocnemius. They can do this for a few minutes on each leg.

Foam Roller for Calf Muscles
The gymnast can also get at more localized tightness by using a lacrosse ball or tennis ball. They can lay on the floor and put it under their leg, or they can use a block to sit on the edge and roll up and down the calf muscles.

Elevated Myofascial Release for Calves Using Racquetball
The soleus muscle is a little bit trickier to get at because it lies deep in the leg. It can however be worked on by moving closely between to the shin bone (tibia) and the bulkier part of the calf. One way that I have learned to get about this from some manual therapy text books is to put the lacrosse ball or tennis ball just next to the shin bone on the outside and inside. The soleus muscle becomes somewhat exposed around this part of the leg.

Positioning of Lacrosse/Tennis Ball for outer Soleus soft tissue work
Although it is not exclusively the Soleus, the general area is good to work on due to the amount of impact gymnastics puts on the lower leg. The gymnast can either push the ball into this space, or do a “pigeon” type position to help lean into the ball. The inside is especially important because many gymnasts with flat feet typically get tighter on the inside portion of the Achilles, as I talked about related to some research in last weeks post. The outside of this area can also help to release the muscles called the peronneals as well, that can be very short and restricted in someone who is always in a flat foot position. It’s hard to get good pressure through the inside, but gymnasts can use their arms to push into this area and find areas that are tight/sore. This area will often be tender because many gymnasts don’t address it, so be careful about how aggressive to work on this area.

Positioning of Lacrosse/Tennis Ball for outer Soleus soft tissue work in “pigeon”

Lateral Soleus soft tissue release with lacrosse ball

Medial Soleus soft tissue release with lacrosse ball
Another great way to help get as some of the local tender points is to position the ball in one spot, then pump the foot into a “toe point and toe up” movement. This is known as more of an active myofascial release, and although it’s more intense helps to get into the more restricted tissue types.

Active Myofascial Release technique for Solues/Gastrocnemius – Toe Up

Active Myofascial Release technique for Solues/Gastrocnemius – Toe Point
The gymnast can also use a rolling “stick” to help massage over some of the these areas along the back, inside, and outside of the lower leg. I was able to find a way to make them from small PVC pipes for relatively cheap from Home Depot, which I showed in a post you can find about here.

PVC Rolling Sticks

Self Calf Myofascial Release Using PVC Rolling Stick
3) Use Proper Stretching of The Gastrocnemius and Soleus
The easiest way I have found for gymnasts to correctly work on their calf stretching (other than the typical calf stretch in a warm up) is to use the end of a beam base. To stretch the gastrocnemius, you must make sure the leg is straight because this muscle crosses across both the knee and ankle. Have the athlete start with their foot flat against the beam, and knee straight. The athlete will keep their heel pressed down, then shift their weight into the beam until a stretch is felt. Perform 2-3 sets of 30 seconds on both legs. This is easy enough to do during practice, gymnasts spend time hanging out at the end of a beam waiting for a turn anyway.

Gastrocnemius Stretch Using Beam Base
The same type of stretch can be done with a bent knee to target the solues muscle. The soleus muscle doesn’t cross over the knee joint, it originates below the knee on the two lower leg bones. This stretch is very important for reducing Achilles tightness because the majority of landings and tumbling passes rely on a bent knee angle to properly accept forces through the leg. Again, have the athlete keep the heel pressed and lean forward until a stretch is felt. Targeting both the Gastrocnemius and Soleus muscle is important for optimal ankle flexibility.

Soleus Stretch Using Beam Base
Banded Lunge Stretch: Another great way to work on stretching the soft tissue while also helping the ankle joint to move better is to use a banded lunge stretch. Have the athlete loop the band around a beam base, and pull it out. The athlete will assume a 1/2 kneeling lunge position,and put their foot through the loop with their toes facing the beam. The loop should be pulling just above the ankle under the calf muscle. The athlete will then back up to get tension on the band.

Dorsiflexion Mobilization with Band Assist Step 1
While holding the foot down braced with a hand, have the athlete lift pull the ankle up gently (to provide a small joint distraction force), and then lean forward into the lunge stretch. This helps to allow some proper gliding of the joint with the distraction force and the band, while also stretching the athletes calf musculature.

Dorsiflexion Mobilization with Band Assist Step 2
4) Pro-Actively Addressing Flat Feet/Excessive Pronation, and Single Leg Stability
I have written a few articles (follow link here to read) related to why flat feet can be a concern in gymnasts. The risk of overuse/traumatic Achilles tears related to flat feet was something I touched on last week. It can also have a huge impact on injuries related to the foot, knee, hip, and spine due to the influence of alignment and connected lower body chain functions. Having proper arches as well as strength often times helps to aid in shock absorption, promote better foot/ankle alignment, and help symmetrically load the Achilles tendon. Overtime, this may help make a huge difference in how much stress the Achilles is taking. Small differences in forces and stress across multiple impact landings/turns/practices can be huge for injury risks.

As I talked about last week, I have been seeing a lot of gymnasts doing single leg beam, floor, and tumbling work in very improperly aligned and dangerous lower leg positions. This can be a result of a lack of education, poor training habits, poor single leg stability, weakness/tightness or certain structures, fatigue, and many more. This concept links to building up proper landing and jumping mechanics which will come below. Readers can find a lot of information related to pre-hab for flat feet and these issues from my articles or other great resources, but here are a few new techniques that I have found through researching and reading some great information from the running area of Physical Therapy.
Tilted Spring Board Balancing – I listened to a few great interviews from Chris Johnson, who is a very well-known PT that works with a lot of runners/tri-atheltes. I think some of the information he puts out about flat feet and excessive pronation is great for gymnasts to take and use in their pre-hab programs. One of the drills he offers for combating overly flat feet and training arch support muscles uses a slanted tilt board, or mat. The gymnast will stand sideways with the inside of their foot towards the end of the springboard, then move into a single leg hold position. Assuming this position and doing single leg balance drills causes areas like the intrinsic foot muscles and posterior tibialis to fire to prevent falling over. It is very important that the gymnasts actively think about holding a strong arch to not pinch on some of the tissues on the outside of the leg. Building up these muscles then helps to get stronger arch support, and aid in shock absorption. I’ll also include the youtube link from his website where he does this with a balance board (http://www.youtube.com/watch?v=QgEZCU2S-qM)

Single Leg Hold with springboard – inside of foot towards bottom of board
Single Leg Dead Lifting Work – I’m a huge fan of using single leg dead lifting work with my gymnasts for the many benefits it can have on training the core/lower leg out of a dangerous position (stressing no hip rotating in, knee caving in, excessively flat feet, or trunk falling to side) when done correctly and with technique being stressed. Not only is it great for pre-hab/injury risk,it is also fantastic to help train gymnasts on single leg stability work they may need for many skills in gymnastics, and when they may land with one leg before the other which is dangerous. Building up core and lower leg chain stability through a single leg can help to keep the leg out of this risky alignment position that can also reduce the amount of stress going through the Achilles and foot. We have been adding them into some of our beam workouts most recently to make the best use of our time.

Single Leg Dead Lifting Drills During Beam Work Out
Before a gymnast can practice single leg deadlifting they must show complete control of single leg standing/balancing, as well as good control standing on one leg with some basic movements like knee raises or kicking. Most gymnasts can do this just fine, so they can start with the easier version of a single leg dead lift has the gymnast starting by standing on one leg with the other leg raised in a holding position. The gymnast will hinge from the hips and reach for the floor in front of them with the opposite arm. Make sure they keeping the spine neutral, toe/knee/hip all in line straight ahead, and knee slightly bent. The athlete should be able to show smooth slow control as they reach and hover above the floor, then return to the starting position. The athlete must master this with proper technique and positioning before they are moved to harder versions. Using a mirror for feedback initially is really helpful.

SL Deadlift Front – Start
SL Deadlift Front – Lower

SL Deadlift Front – Touch
SL Deadlift Front – Return
SL Deadlift Front – End
Following this, many higher level gymnasts will want to be challenged a little more. The first way to do this is to use a light weight in the opposite reaching hand to further challenge the stability and control demands of the core and leg on the ground. Again, always look for quality of movement more than the quantity of cranking out 10 of these. Make sure the exercise and weight aren’t too difficulty causing the gymnast to flail around and compensate.

SL Deadlift Weight Side – Start

SL Deadlift Weight Side – Touch

SL Dead Lift Front View with Weight
One of my favorite versions of this drill involves using an elastic tubing resistance to further challenge the gymnast. The gymnast will loop an elastic band around a beam or bar base, coming from the direction of the leg they are standing on (right leg planted means the band comes from the right). The gymnast will hold the handle with two hands, and step out far enough so there is a little bit of tension on the band. The gymnast will then perform the same single leg deadlift while attempting to not let the band pull them out of good spine, hip, knee, and foot alignment. This is great to work on because the band will make the athlete want to rotate and fall into the bad alignment of a foot flat, knee and hip rotated in position. When done correctly, single leg dead lifting it is a great way to train the core and lower body in single leg stance. Although this has great carry over for stability and absorption of forces preventing Achilles problems, it also has a ton of other great benefits. We recently have been adding this pre-hab drill into our beam circuits as an active rest turn.

SL Deadlift Elastic Front -Start

SL Deadlift Elastic Front – Lower

SL Deadlift Elastic Front – Mid
SL Deadlift Elastic Front – Return
SL Deadlift Elastic Front -End
5) Work on Hip Flexor and Quadricep Soft Tissue Mobility
Another area that tends to become chronically tight and restricted on gymnasts are the hip flexors and quadricep muscles which are on the front of the thigh. This is often due to the extensive amount of leg lifting, jumping, and hip flexing/knee straightening motions that happen in gymnastics. These muscles can also be part of the issue related to pulling the pelvis forward and creating and arch lower back posture known as an anterior pelvic tilt. Together the anterior tilt and tightness of the quadricep muscles can be one problem affecting the gymnasts ability to properly land and squat. This can be an issue when a gymnast has this posture along with faulty jumping and landing mechanics. This often times creating a situation when the weight is primarily through front of the foot which can also lead to a quadricep dominant landing position. This can then in turn cause a lot of stress to go through the ankle joint, Achilles, and knee joint as the force are not properly dispersed through the hamstrings, glutes, and trunk. Remember this is for someone who has a flexibility or mobility problem in their hip joint/hip muscles. Sometime’s gymnasts go on the other side of the spectrum being excessively flexible and wobbly. We don’t want people with ton’s of leg flexible getting excessively mobile, those gymnasts typically have issues more related to stability, technique, or control.
I have posted a few articles that go into the hip flexors and quads in depth, which you can find through the blog here. Here are just a few pictures from those articles to reference.

Foam Roller for Quads

Hip Flexor Release Technique Using Lacrosse Ball on Low Beam

Using a Home Made PVC “Stick” to perform MFR to Quads
6.) Use Proper Jumping, Landing, and Impact Mechanics
By far one of the best things coaches and gymnasts can do is to take the time to educate, teach, and practice safe jumping/ landing/squatting/impact mechanics. This is many times an area that is a bit controversial for gymnastics, due to the requirements that the code of points places on athletes. The way gymnasts are typically required to land and tumble to not get deducted can sometimes be a bit scary, because it is often times not the most ideal technique to absorb body weight and the very high forces produced by tumbling/landing. Some problems seen during many impact take off or landings are
- the knees and hips are not flexing enough (“chest up” or stiff landing). We want this to happen so large muscles like the glutes can eccentrically accept body weight forces, taking pressure off other one of which is the Achilles.
- the legs are together causing a smaller base of support and decreasing a gymnast’s ability to properly disperse forces through the entire lower leg chain and trunk
- the knees are coming together, especially as the feet flatten (over pronate) and the arches collapse. As I talked about last week increased flat feet may cause a significant more amount of force through the inside of the Achilles tendon over time
- the knees are drifted forward over the toes as the athlete pushes primarily through their toes, which significantly stresses the Achilles
- the athlete is skewed or twisted slightly in their landing, and often times one foot/leg is hitting the ground before the other which momentarily causes all of the force to go through one ankle and Achilles
All of these types of errors have been identified in many research articles in different populations/sports. These have then driven the creation some good preventative programs, and also screening tools like the LESS (Landing Error Scoring System). There is a substantial amount of research and evidence that supports certain landing techniques should be emphasized to allow the proper distribution of forces across the trunk and lower leg systems. Two months ago my good friend Dr. Joe Myhren I wrote a pretty in depth article (follow this link to find it) about ways coaches can look to see if their gymnasts may have bad jumping , squatting, and landing mechanics in different conditions. There are also ton’s of good resources available through the work of Dr. Josh Eldridge’s website Gymnast Care, and through USA gymnastics. If you notice a lot of your athlete’s with these types of problems, it is well worth your time to look into getting some sort of trained medical professional like a Physical Therapist or Athletic Trainer to come asess and teach your gym about proper mechanics. Dr. Josh Eldridge did a great podcast interview with judge Lee Bjella where they discussed a lot of these code of points related issues which is a great listen. (http://gymnastcare.com/session10). Although it is a topic too lengthy for this post, these are just a few things you want to look out for in your gymnasts or your own gymnastics to help not only the Achilles risk but also the risk of many other type of traumatic/overuse injuries.
Concluding Thoughts
Although this post certainly hasn’t covered every piece to the prevention of Achilles tears, I think that this information is a really good for coaches and gymnasts to process. I’m sure this topic of preventing Achilles tears in gymnastics could be an entire weekend course in itself, and I’m sure as many people read this more ideas will come up about things I did not touch on. Areas like equipment, the code, other structural biomechanics, and proper training certainly can be expanded on. The concept of some gymnasts not having enough muscular strength and development to handle the forces of gymnastics is an entirely different topic that needs it’s own article series as well. These are just some of the areas that come to mind for me when I am concerned that a gymnast may be heading down the wrong path, and I wanted to give coaches and gymnastics some tools to have during training. I think that this type of thought process related to preventative rehabilitation is really important for gymnasts and coaches in an effort to possibly reduce the rates of Achilles injuries in the sport. I hope that this information is all useful for the readers, and that people can start to build some of these techniques directly into their training in an effort to help out. Best of luck,
Dave
References
- Clanton, TO. Return to Play in Athletes Following Ankle Injuries. Sports Health: A Multidisciplinary Approach. October 2012; 4 (6): 471 – 474
- Kader D , Saxena A , Movin T , et al . Achilles tendinopathy: some aspects of basic science and clinical management . Br J Sports Med . 2002 ; 36 : 239 – 249 .
- Martin RL, et al. Clinical Practice Guideline: Ankle Stability and Movement Coordination Impairments: Ankle Ligament Sprains. JOSPT. September 2013; 43(9) A2 – A40
- Wertz, et al. Achilles Tendon Rupture: Risk Assessment for Aerial and Ground Athletes. Sports Health: A Multidisciplinary Approach. Sept/Oct 2013; 5 (5): 407 – 416
- Caine D., et al. The Handbook of Sports Medicine In Gymnastics. First Edition. John Wiley and Sons, 2013
- Bradshaw E.J., Hume P.A. Biomechanical approaches to identify and quantify injury mechanisms and risk factors in women’s artistic gymnastics. Sports Biomechanics. 2012; 11(3) 324 – 341
- DeLee JC , Drez D , Miller MD . Achilles tendon injuries . In: Orthopaedic. Sports Medicine: Principles and Practice . 3rd ed. Philadelphia, PA : Saunders Elsevier ; 2010 : 2182 – 2205 .
- de Vries JS., Krips R., Blankevoort L., van Dijk CN. Interventions For Treating Chronic Ankle Instability: A Systematic Review. The Cochrane Library; 2011 (8)
- Chilvers M, Donahue M, Nassar L, Manoli A. “Foot and Ankle Injuries in Elite Female Gymnasts”. Foot & Ankle International, Vol 28, No.2, Pages 214-218, Feb, 2007.
- Myers TW. Anatomy Trains: Mysofascial Meridians for Manual and Movement Therapists. Second Edition. 2009
- Peak Performance: The Research Newsletter on Stamina, Strength and Fitness. Achilles Tendonitis: Prevention & Treatment. 2004; Peak Performance Publishing, Goswell Road, London.
- Starrett, K. Moving Like A Supple Leopard. 2013
- Smith-Young, B. – “How To Avoid Achilles Tendon Rupture” (http://www.gymmomentum.com/uncategorized/how-to-avoid-tendon-rupture/?utm_source=feedburner&utm_medium=feed&utm_campaign=Feed%3A%20GymMomentum%20%28Gym%20Momentum%29&utm_content=Google%20Reader)
- Gymnast Care Podcast – Dr. Josh Eldrdige and Dr. Bill Sands (http://gymnastcare.com/dr-bill-sands-transcript-of-podcast-interview)
- Chris Johnson Podcast Interview – Dan Pope’s website Fitness Pain Free (http://fitnesspainfree.com/fpf-podcast-episode-31-diagnosing-and-treating-running-injuries-with-chris-johnson-part-1/)
- The LESS (Landing Error Scoring System) Handout Reference – (http://www.iprc.unc.edu/jumpacl/LESS%20Training%20Materials.pdf)


